Enter and Approve Expense Sheets
If Employees spend their own money during business activities, the expense can be posted to the Employee's account. The Employee can be reimbursed by making a payment to the Employee's bank account, similar to how Vendors are paid.
Expense Sheets can also be created when an Employee uses Company credit cards for expenses, so the credit card expense is recognized.
Expense Sheet Entry
Expense Sheets can be accessed in a number of ways:
Open Expense Sheet List: From the Role Center page and click the Open Expense Sheets tile for access to the current user’s Expense Sheets with a status of Open.
Role Center: Navigate to the Role Center > Time & Expense > Open Expense Sheets list. The list displays open Expense Sheets.
Tip
Expense Sheets can also be accessed by navigating from the Role Center > Resources > Resources and selecting a Resource. From the Resource Card select Actions > Expense > Open Expense Sheets. The same selections are available from the Resource List page.
Create an Expense Sheet
Click + New to create an Expense Sheet.
Header FastTab
General
| Field Name | Description |
|---|---|
| Expense Sheet No. |
Specifies the number the system will generate for this Expense Sheet based on the numbering sequence selected. |
| Expense Sheet No. | Populates automatically when tabbing off the field or when selecting the Expense Sheet Date field. |
| Resource | Specifies the Resource Number of the user. System populated by tabbing to the Expense Sheet Date. |
| Expense Sheet Date | Specifies the date for which this Expense Sheet is entered. Will default to the system date, today’s date. |
| Posting Date Override | The Posting Override Date defaults to the Expense Sheet Date but does not have to be the same date. Users may change the dates. |
| Expense Sheet Status | Specifies the status of the Expense Sheet which will indicate open, approval level, rejection, or posted. |
Totals
Displays a running total of each Expense Payment Type including calculated taxes and credit card adjustments. See: Expense Payment Types
| Field Name | Description |
|---|---|
| Company Paid |
Specifies the total of all Company paid expenses. |
| Resource Paid | Specifies the total of all Resource paid expenses. |
| Advance | Specifies the total of all Advance amounts. |
| Repayment | Specifies the total of all Repayment amounts. |
| Payroll | Specifies the total of all reimbursements via Payroll. |
| Total Cost |
Specifies the total cost of all expenses in local currency. |
| Expense Total Incl Tax | Specifies the Expense Total including any tax. |
| Total Credit Card Adj. | Specifies the total of Credit Card Adjustments. |
| Total Expense Amount | Specifies the Expense Sheet total including tax and Credit Card Adjustments. |
Lines FastTab
Manage tab
| Field Name | Description |
|---|---|
| New line |
Click to create a new line. |
| Delete line | Click to delete the currently selected line. To select multiple lines to delete, click the Show more options ellipsis on a line, then Select More. An additional column with circles will be displayed. Choose the circle for each line to be deleted. Click Delete Line. |
Line
| Field Name | Description |
|---|---|
| Dimensions |
Select the Dimensions for each line. |
| Expense Entry Card | Opens the Expense/Item Entry Card displaying the information on the selected expense line. |
| Rejected Remarks | Displays the remarks entered by the Approver for the rejected entry. |
| Expense Entry Comments | Enter and view comments for the selected ent entry. |
| Expense Attachments | Enter and view attachments for the selected entry. |
| View Attachments | Displays the attachments added for the entry. |
To add new Expense Sheet Lines, complete the following fields:
| Field Name | Description |
|---|---|
| Project No. |
Specifies the Project Number to which this entry will be charged. Lookup will show Projects available for expense entries. |
| Project Task No. | Specifies the Task Number for the Project to which this entry will be charged. Lookup is available to show Tasks the user can charge. |
Note
The following fields (Global Dimension 1 and Global Dimension 2) are only displayed if Progressus Multi-Company is activated. For more information, see: MEM and Progressus Multi-Company Integration Documentation
| Global Dimension 1 |
Specifies the code for Global Dimension 1. |
| Global Dimension 2 | Specifies the code for Global Dimension 2. |
| Expense Date | Specifies the date the expense occurred. Populates from the Header but can be changed. |
| Posting Date | Specifies the posting date of the entry. Populates from the Header but can be changed. |
| Type | Specifies if this is an Expense or an Item to be charged to the Project. Based on this selection the user will need to populate fields on the line that are Expense specific or Item specific. Options: Expense or Item. |
| Expense Payment Type | Specify the Expense Payment Type from the Expense Payment Type list. This field determines to which total category in the header the expense is added. Payment Types are used to classify the expense, e.g., Employee-Paid AP is sent to AP to reimburse the Employee. Expense Payment Types include Expense Posting, AP or GL, General Journal Template and General Journal Batch information. |
| No. | Specifies the code for charging the Expense or Item No. Possible values change depending on whether Expense or Item is selected in the Type field. |
| Description | Specifies the description for the Expense or Item selected. |
| Purpose | Specifies user-defined text information as to the reason for the entry. |
| Work Type Code | Specifies the Currency Code in which this entry is ent Specifies the Project Work Type Code used to modify pricing. |
| Currency Code | Specifies the Currency Code for the entry. Used when payment is in a currency different from the company default. |
| Cost Type | Specifies the Cost Type to be assigned to this entry. This can be used for reporting. |
| Credit Card Code | Specifies the Code for the Credit Card used to pay for this charge. Required for Company-Paid AP Expense Payment Type. |
| Quantity | Specifies the number of units for the Item or Expense. |
| Unit of Measure Code | Specifies the unit of measure to be applied for the quantity on this Item or Expense. |
| Unit Cost | Specifies the unit cost of the entry. Enter an amount if different from the defaulted value. |
| Tax Area Code | Specifies the tax area used to calculate and post the sales tax. |
| Unit Cost Incl. Tax | Specifies the Unit Cost including tax. |
| Total Cost | Specifies the Total Cost of the entry, which is calculated as the Unit Cost times the Quantity. |
| Tax Amount | Specifies the VAT amount of the entry on which tax is applicable. The Tax Amount field is not on the entry line by default, but can be added using Personalization. |
| Total Cost Incl. Tax | Specifies the Total Cost including tax. If an amount is entered here the system will recalculate the Unit Cost, Unit Cost Incl. Tax, and Total Cost. |
| Credit Card Adj. LCY | Specifies the amount for credit card adjustments in local currency. |
| Exp. Amt LCY | Specifies the Expense amount in local currency of the entry. |
| Tax group code Emp. Exp | Specifies Tax Group Code for Employee Expense used to calculate and post the sales tax. |
| Unit Price | Specifies the Unit Price of the entry. |
| Total Price | Specifies the Total Price of the entry, which is calculated as the Unit Price times the Quantity. |
| Chargeable | Specifies the Chargeable status of the entry line. |
| Only Payroll Expense | Specifies if this is only a payroll expense. |
| Expense Sheet Status | Displays the level of the Expense line in the workflow. Once the Expense Sheet has been submitted, the status will change to “Waiting XX Approval” and progress to Posted after all approvals and journal posting. |
| Attachments | Click on the value, Yes or No, to add or view a file attached for the line. This option allows the addition of documentation for the Expense, e.g., receipts. File types: GIF, PNG, XLSX, PDF, JPG, DOCX, BMP. When the file is selected, the remaining fields will be populated. |
| Tax Difference | Specifies the tax amount difference from the base tax amount to newly entered tax amount. The Tax Amount field is not on the entry line by default, but can be added using Personalization. |
Note
Edits to the Tax Amount will update the Tax Difference field but will not update Total Cost Incl Tax. The Tax Base Amount and Total Cost will be recalculated to equal (Unit cost * Quantity) - Tax Difference.
Expense Sheet Report
Select Expense Sheet Report to Create and Print, Send to, or Preview & Close a report containing the information for the Expense Sheet. Filters are available.
How Work Types Affect Expense Sheets
Some options can be selected to determine uses and different Costs, Prices for Expenses. For more information, see: Setting up Work Types
Project Expense Card
Related Information: Provides links to Dimensions, Expense Prices List, Expense Payment Types and Project Expense Posting Setup for the selected Code. For more information on Project Expenses, see: Project Expense Types
Expense Payment Types
Use Expense Payment Types to establish defaults to use when Expense Sheets are created. Expense Types determine the location to which the payment is posted and the Expense Type function. For example, if it is a Company paid expense, the posting is either Accounts Payable for a credit card Vendor, or the General Ledger. Expense Payments Type codes are user-defined.
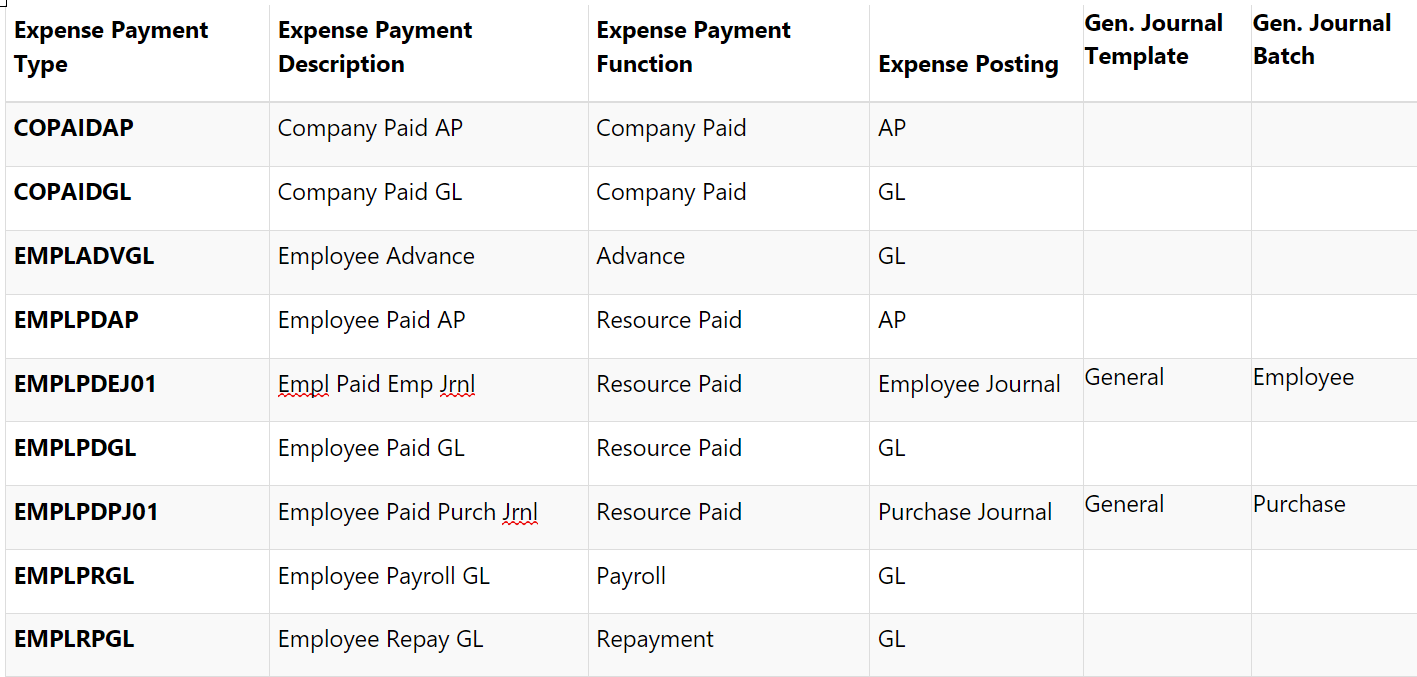
For more information on Expense Payment Types, see: Expense Payment Types
Project and Task Permissions
Certain Project Permissions can restrict a user's ability to view or enter any transactions against a Project. There is also a Resource Permission which can give users the ability to approve their own Expense Sheets. For more information on Progressus Permissions, see: Permissions Overview
How to Enter Invoice Comments on an Expense Sheet
To enter Invoice Comments on an Expense Sheet, after completing the necessary fields on an Expense Sheet line:
Select Lines > Line.
Click Expense Entry Comments.
Add a new comment for the line.
Click Close to return to the Expense Sheet line.
The Expense Sheet Comments FactBox field now displays the comment entered on that line.
How to Enter Attachments to an Expense Sheet
To enter attachments to an Expense Sheet, after completing the necessary fields on an Expense Sheet line:
Select the line to add an attachment.
Click the No link in the Attachments field.
Click the Select File link.
Click Choose to select the file to attach.
Click Close to return to the Expense Sheet Entry page.
The Attachments field now displays Yes to indicate there is an attachment entered on that line.
How to Enter an Expense Sheet for Another User
Impersonator
To set up an Impersonator on a Resource who can enter Expense Sheets on your behalf, use the following steps:
Navigate to the Resource Card.
Select Actions > Alternates > Impersonator.
The Resource Impersonator page opens.
Click the dropdown in the Impersonator Code field and select a Resource.
Note
Under Alternates FastTab, the option for Impersonator Setup is now enabled.
Impersonates
To impersonate another Resource so enter Expense Sheets on their behalf, use these steps:
Navigate to a Resource Card.
Select Actions > Alternates > Impersonates.
- The Resource Impersonates Card opens.
Select the Resource No., from the Resource Code field lookup, for the person who will be Impersonated.
Open the Resource Card for the Resource selected in the previous step.
- Note that under Alternates FastTab, the option for Impersonator Setup is now enabled.
Tip
To view which Resource(s) are set up to be an Impersonator or Impersonates, navigate to the Resource Card > Actions, and select either Impersonator or Impersonates to view the Resources assigned.
Enter Expenses into the Expense Journal
For information on entering expenses directly into the Expense Journal, see: Expense Journal.
For information on importing expenses into the Expense Journal, see: Create a new expense journal batch by importing values
How to Enter Amounts Including Tax or VAT
Use these steps to calculate and add Sales Tax or VAT to an Expense Sheet line:
Note
The Project Expense Code used on the line must have a Tax Group Code assigned to it that is taxable.
Navigate to Role Center .> Actions > Setup > Items & Expenses Setup > Expenses
Choose the Invoicing FastTab. Use the lookup to add a Code to the Tax Group Code field.
Tip
The calculated Sales Tax is added to the Total Cost and displays as the sum of the Sales Tax plus Total Cost in the Total Cost Incl. Tax field.
How to Add Credit Card Fees to an Expense Sheet
Credit card fees may be assessed by a Vendor when an expense is incurred and paid for by a credit card. For example, a Vendor may have a minimum amount that can be charged. Anything under that amount is assessed a credit card fee.
To add a credit card fee to an Expense Sheet, select the appropriate line in the Expense Sheet, then add the fee amount to the Credit Card Adj. LCY field.
Note
Credit card fees are associated with an Expense Code and must have a Posting Account established. Set this up in Setup > Items & Expense Setup > Project Exp Posting Setup > Credit Card Expense Debit for any Expense Codes used. For more information, see: Project Expense Posting Setup. For information on setting up Credit Card Codes, see: Credit Card Setup
How to Reopen an Expense Sheet
Navigate to the Role Center > Posted Document > Expense Sheet Archive.
Select Reopen Expense Sheet to change the Status to Open and make the Expense Sheet available for changes or additions. The Expense Sheet may not be reopened after it has been Posted.
To review the reopened Expense Sheet, navigate to Time & Expense > Open Expense Sheets.
How to Set Up a Resource as a Vendor so they can be Reimbursed for Expenses
To reimburse a Resource for expenses they paid, set the Resource up as a Vendor and add the Vendor Number to their Resource Card. To do this, use these steps:
Navigate to Resources > Resources and select the desired Resource Card.
Expand the Expense Sheet FastTab and click Vendor.
Click + New
Select a template for a new Vendor.
Complete required fields in the Vendor Card and click OK
The new Vendor Number displays in Vendor on the Resource Card.
How to Approve or Reject an Expense Sheet
Log into the Role Center with a User ID that includes Expense Sheet Approval Permissions. For more information about Permissions, see: Permissions Overview
Tip
Current functionality in Expense Sheet Approval page displays a limit of 10 lines for approval. However, a new feature provides the ability to display more than 10 lines of data for Expense Sheet Approval. This feature will be required in a future release. To use the feature at this time, it must be enabled in Progressus Feature Management. For more information, see: Progressus Feature Management
Navigate to the Role Center > Activities > Expense Approval.
Important
Expense Sheet Approval can be set up for up to 3 levels of approval.
The View As field displays any Expense Sheets waiting for approval in any of the 3 levels. Options:
Field Name Description View As: 1st layer This is typically the Project Manager or the Person Responsible for the Project. View As: 2nd layer This is typically the Line Manager or Line Manager 2. View As: 3rd layer This is typically a Project Executive. Filters are available in the Option section, such as Date Filter, View By, and Project No.
To view details in the Expense Sheet Lines at the bottom of the page, click any of the Totals columns to drill into the detail lines for that total.
Click Attachments (where the value is yes) to display the attachment that corresponds with the Expense Sheet Line.
To post or reject a specific line in an Expense Sheet, click the value in the Total Expense Amount column to open the Expense Sheet line.
Place the cursor on the line to be posted or rejected, then:
- Click Approve to approve the selected line(s).
- Click Reject to reject the selected line.
- Click Reject All to reject all the lines in the grid.
To reject a line or an Expense Sheet, select the line to reject, then select Entries > Reject. The Rejected Remarks page will open. Enter a remark to document the reason the Expense line is being rejected. Click Close to return to the Expense/Item Entry page.
How to Set Up Email Notifications of Approved or Rejected Expense Sheets
When an Expense Sheet is approved or rejected, it is optional to send an email notification to the Resource. To do this:
Navigate to the Role Center > Setup > Resource Setup > Time Config List.
Open the Time Configuration Code used with the Resource.
In the Expense Sheet FastTab > set Email on Exp. Appr. to true. This field, when set to true, sends an email alert to a Resource when an Expense Sheet has final approval or a rejection.
Enable SMTP Mail to create approved and rejected Expense Sheet email messages in Resource Setup > Mail Notifications and ensure the Resource Card includes an email address.
Enable SMTP Email
From the Search box, enter Email Accounts, and then select the related link.
Fill in fields to enable SMTP mail. For information on how to complete an SMTP Account, see: Setup Email
Add Mail Notifications for Rejected or Approved Expense Sheets
- Navigate to Role Center > Resource Setup > Mail Notifications > Expense sheet column.
| Field Name | Description |
|---|---|
| Mail Body for Rejection Expense |
Add text similar to: Expense Sheet %3 Date %4 was rejected by %5 - %6 for Resource %1 - %2. Reason: %7 |
| Mail Subject for Rejection Expense | Add text similar to: Expense Sheet %3 Date %4 was rejected by %5 - %6 for Resource %1 - %2. Reason: %7 |
| Mail Body for Expense Sheet Approved | Add text similar to: Expense Sheet %3 Date %4 was approved by %5 - %6 for Resource %1 - %2. |
| Mail Subject for Expense Sheet Approved | Add text similar to: Expense Sheet %3 Date %4 was approved by %5 - %6 for Resource %1 - %2. |
For more information, see: Notification of Timesheet or Expense Sheet Approvals or Rejections
Verify the Resource includes an Email address in their Resource Card
Navigate to the Role Center > Resources > Resources.
Select a Resource and open the Resource Card.
Navigate to Personal Data FastTab > E-Mail. Ensure a valid email address is entered in this field.
How to Resubmit a Rejected Expense Sheet
Use these steps to resubmit an Expense Sheet that was rejected:
Method 1
Navigate to the Role Center > Resources > Resources.
Either highlight the Resource > Actions > Expense > Open Expense Sheets,
or click on the name to open the Resource Card > Actions > Expense > Open Expense Sheets.
Click on the Expense Sheet No. for the rejected Expense Sheet.
Method 2
Navigate to the Role Center > Time & Expense > Open Expense Sheets.
Locate the rejected Expense Sheet in the list.
Tip
Use the Search box to search for the Expense Sheet by name, or by rejected. Or use the Filter to narrow displayed results by Expense Sheet Status = Rejected.
Click the Expense Sheet No. to select the rejected Expense Sheet.
View Remarks about Why the Expense Sheet Line was Rejected
Highlight the line where the Expense Sheet Status = Rejected.
Click Line > Rejected Comments to review comments made by approver upon rejecting the line.
Make changes to any line(s) where Status is Rejected.
Click Submit Expense Sheet to resubmit Expense Sheet for approval.
How to Post an Expense Sheet
- Navigate to the Expense Journal under Role Center > Journals > Expense Journal
Tip
The default Journal used is defined in Project Setup > Time and Expense Registry > Use Exp Journal for Expense Sheets. If selected, true, specifies that the Expense Journal will be used to post approved Expense Sheets instead of the Project Journal. For more information, see: Time and Expense Registry
Select the Journal Template set up for Time and Expense entry.
Select the Expense batch.
The batch will display lines waiting for approval. Review quantity and cost fields and verify all other field information is correct.
Navigate to the Header area and select Post/Print > Post.
Select Yes to the message "Do you want to post the journal lines".
Select OK to the message "The journal lines have been successfully posted".
To view the result of posting, navigate to the Project(s) used in the transaction.
Navigate to the Role Center > Projects > Projects > and open the applicable Project.
Locate the Task used in the transaction and view the update from the transactions in the Total Usage Cost column.
Select the amount in the Total Usage column to drill down into the supporting details and view the update from the Expense Sheet batch.
For more information see: